

Last time we took a look at setting up and shooting images for the circular star trail. Following those steps you should have captured a rather large number of images. As I said last time the above image is comprised of 85 individual pinpoint star images. The actual number you will have captured is a direct result of how long you allow the camera to run. These images were captured over a 45 minute period but you could go longer or shorter which will affect the length of the trails in the final image.
Stacking the Captured Images
The first step, at least for me, is to load the captured images into Lightroom. It is important to note that, with very few exceptions, whatever develop adjustments you apply to these images must be applied to all the images in the group. I do this in the Develop Module by clicking on the first image in the group and then shift-clicking on the last image in the group. Be careful when selecting these images that you don’t inadvertently select your test frames at the beginning. Be sure that Auto Sync is turned on at the bottom of the right panel. Now any adjustment you apply is applied equally to all the selected images. It is difficult to tell you exactly what adjustments to make, so much is dependent on exposure, ISO, weather, and other variables. I will generally increase the Highlights and decrease the Blacks sliders. A little increase in Clarity will help the stars stand out and sometimes a little increase in Dehaze will help too. If you need to apply Noise Reduction do so carefully. Too much and you will make stars disappear because the algorithm sometimes can’t differentiate between the stars and noise. When you are happy with the way the images look it is important to now deselect the group back down to one image. Do so by clicking in the border of any one image.

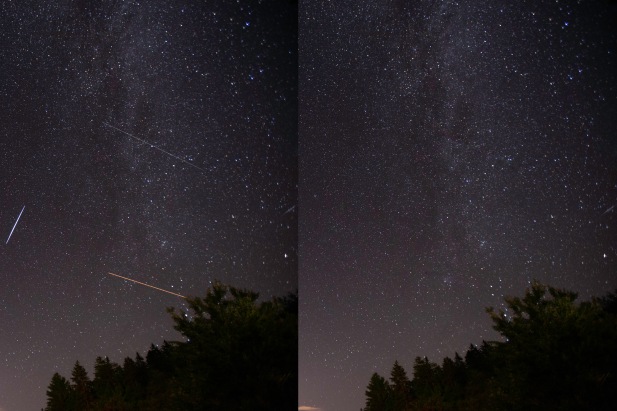
The next step is to clean up each individual image. Over the time that the images were captures it is very likely that you will have something unwanted, such as an airplane, meteor, or satellite, encroach into one or more of the images. The best way to clean this up is on each individual image not the stacked group. It is entirely too difficult to remove these objects and keep the star trails in alignment in the final image. The best way to do this is using the Spot Removal Tool in Lightroom. When you find a streak that you wish to remove you can click and drag the Spot Removal tool along its length to remove it but here’s a tip that might make it easier and more precise. You can use the spot removal tool in such a way that it will clean up a straight line.
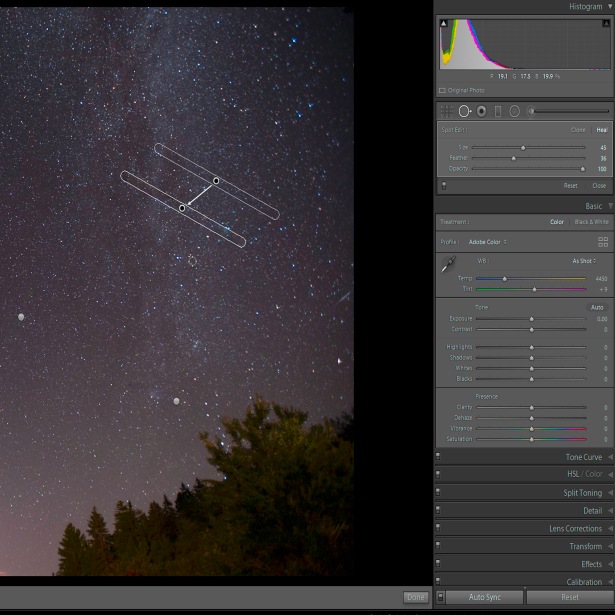
To do this hover the cursor over one end of the streak and give it one click and release. The Spot Removal Tool will try and clean up that end of the streak but it’s OK just ignore it for now. Move the cursor to the other end of the streak and, while holding down the shift key, give it one click and release. The Spot Removal Tool will now connect the two “spots” and clean up everything in between. It may sound more complicated at first but after you use it a few times it becomes very quick and easy. There will always be some duplication of objects in the cleaned areas, that’s how the Spot Removal Tool does its job, but if there is a major, obvious duplication such as a bright star or planet you can make it less obvious by clicking on and moving the “source” area (the area that the stars are cloned from) to a new location. And by the way all of this works a little better if the Spot Removal Tool is set to Heal instead of clone.
Once all of the images are cleaned up to your satisfaction we will need to move them to Photoshop for the final step. Once again you will need to select all of the images by clicking the first one and then shift-clicking the last one. Right-click on any image in the group and hover the cursor over Edit In. Go down to the bottom of that list and select “Open as Layers in Photoshop”. This may take some time especially if you have a lot of images and a slower computer. It may at time appear as though there is nothing happening. Be patient! Eventually all of the images will load and each individual image will be on its own layer. You must now select all of the layers. In the Layers Palette click on the first layer then scroll to the bottom and shift-click the last layer. If you don’t see the Layers Palette got to the Window menu and select Layers or hit the F7 (Function-7) key. Once all of the layers are selected look near the top of the Layers Palette for a drop down menu that usually says Normal in the window. This is the Blending Mode menu. Click it to open the menu and select “Lighten”. All of the layers will be combined in such a ways that the brightest parts, the stars, show through. Take a moment to admire your handiwork in awe and wonder!
There is still a bit of tidying up we will need to do unless you wish to be left with a massive image file! Go to the Layer menu and, near the bottom, click on Flatten Image. This will compress all of the layers down in to one and shed some of the redundant data making for a much smaller, more manageable file size. At this point you can save the file using the Lightroom generated filename (File>Save) or you can choose to give the file its own unique name (File>Save As). I usually will append the word Stacked to the file name (i.e. IMG_1234_Stacked) just to set it off from the other image files. In either case the image should return to Lightroom, unless you are using an older version, and will be located along with the source files. Any additional clean up or post processing you wish to do can now be accomplished on the final image in Lightroom.
If you are like I was you may look at an image like this and think “that must be hard” or “I could never do that!” If that’s the case I hope you will give it a try, as I did, and discover that, while it might be tedious at times, It is not difficult to do at all! I hope that you will get out on a clear night real soon and give it a try!
